Quick start: set up one PC
This page takes you from a new server to one PC set up with Windows. It gives the shortest path. Each step links to a page with more detail.
What you need
- A Windows server that meets the Requirements.
- Your licence file. See Activate your licence.
- A Windows 11 ISO or WIM file.
- A PC that can start from the network, on a network the server can reach.
- Access to your DHCP server, to set 2 options.
1. Install the server
- Sign in at www.sharp.day and open Downloads.
- Under SharpDay Deploy, select Download .msi next to Deploy.
- Run
SharpDayDeploy-<version>.msion the server.
The server installs as a Windows service. It waits for you to finish setup before it does anything else.
2. Install the Windows ADK
On the server, install the Windows ADK and the Windows PE add-on from Microsoft. Use the same version of both. The server needs them to build boot files.
3. Install the Console
On the Downloads page, select Download .msi next to Console. Run SharpDayConsole-<version>.msi on your own PC, or on the server.
4. Connect and make the first admin
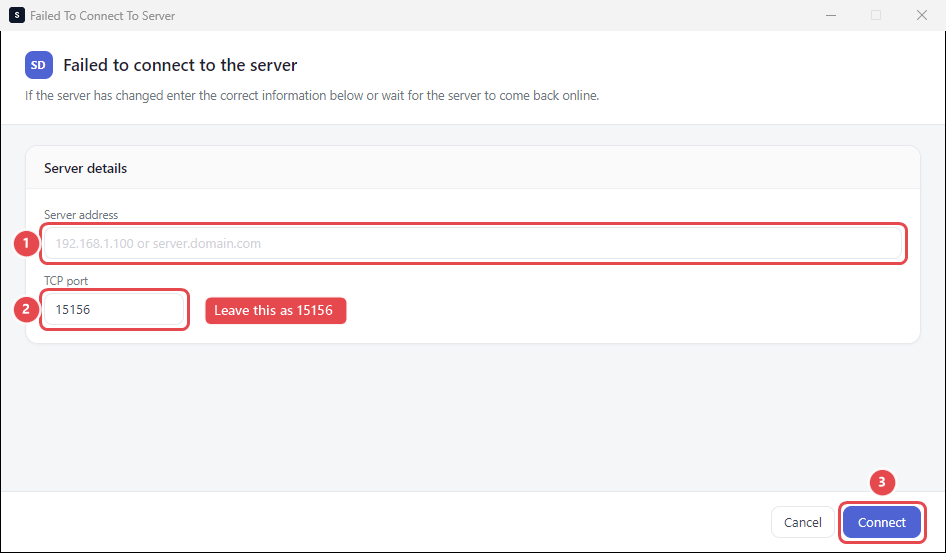
Open SharpDay Deploy Console. It does not know your server yet, so it opens on Failed to connect to the server.
In Server address, enter the server's name or IP address. Leave TCP port as
15156.Select Connect.
The first time you connect, the Console shows the server's certificate fingerprint. Check it matches the fingerprint in the server's log, then select Trust this certificate and connect.
The server has no users yet, so the Console asks you to make the first admin. Fill in Admin user name, then a Password of at least 10 characters, and type it again in Password again. Select Save and sign in.
Important
The first person to connect to a new server makes its admin account. Do this straight after you install the server.
5. Finish setup
The Set up SharpDay Deploy window opens. Go through each step:
- Add your licence, if the server asks for one.
- Choose to set up a new server.
- Check the results of the Checks step, and fix any problem.
- Choose where to keep the share folder.
- Choose the server's network address. Leave it on automatic unless the server has more than one network.
- Check the Review step, then finish.
The server restarts its service, then starts answering PCs. See First time setup for each step.
6. Build a boot image
Make the Windows PE image that PCs start from over the network.
- Go to Boot Files > Boot Files and select Create boot folder.
- Give it a name, choose Windows PE and x64, and select Create.
- When the folder is ready, open it. If your PC needs a network or storage driver that Windows PE does not have, tick it in Drivers.
- Go to Build and select Build WIM File. This adds the PE client to the image. Wait for the log to say
WIM Image Build Complete.
The first boot folder you make for x64 PCs is the one they get. See Build a Windows PE image.
7. Add a Windows image
On Operating Systems > WIM Images, select Upload WIM and pick your Windows 11 WIM file. If you have an ISO instead, upload it on ISO Files, then use Extract... to take the image out of it.
Note which index is the edition you want, such as Windows 11 Pro. Open the image to see its indexes.
See WIM images.
8. Add drivers
On Drivers, download the catalog for your PC's maker, or upload the drivers for its model yourself.
See Drivers.
9. Make a workflow
Make a workflow that wipes the disk, installs your Windows image and adds drivers.
- Go to Automations > Automations and select New workflow.
- Select Wipe, install and join the domain, then select Next.
- On Name, give the workflow a name. Leave Enable Workflow ticked.
- Answer the questions on each page. On Windows image, pick your image and the index you noted. If you do not want to join a domain yet, untick Join the domain.
- On Review, select Make workflow.
The workflow starts with the PE Deployment trigger, so PCs can pick it when they start. See Workflows.
10. Point the PC at the server
On your DHCP server, set option 66 to the server's name and option 67 to bootmgfw.efi.
See DHCP options.
11. Start the PC from the network
- Turn on the PC and choose to start from the network. Many PCs use F12 for this, but it depends on the maker.
- Windows PE starts, and the PE client connects to the server.
- If the PC asks you to sign in, use an account with the Clients access role. This depends on Admin > Settings > PE Client.
- If the PC is held as an unknown machine, approve it in the Console, or select Sign In to Approve at the PC.
- On Select Deployment, choose your workflow and select Select.
- On Machine Name, keep the name the server gives, or type your own. Select Next.
- On Confirm Deployment, check the details and select Start.
12. Watch it run
In the Console, go to Clients > Active. Select the PC to see each step and its log as it runs. When the deployment ends, you can find it on Clients > History.
Next steps
- Make more workflows for different kinds of PC. Each PC picks its workflow on Select Deployment.
- Use rules on the Reroute page to change what some PCs get, such as a different boot folder or image.
- Give your team their own sign in. See Users and roles.
- Back up the server's settings. See Move, back up and restore.